If you’re not involved in manufacturing production, you might not be familiar with what a wire labeling machine is. However, the fact that you’re reading this article suggests that you either work with this type of equipment or are seeking a guide on how to use it.
You’re in the right place. This article aims to provide a detailed tutorial on operating a wire labeling machine. Even as a beginner, you can learn to use it step-by-step by following this guide.
Another key reason for this tutorial is the demand from many of our customers for a comprehensive guide on how to operate the machine. Next, I will draw on our factory’s production processes to show you in detail how to operate a wire labeling machine.

Inspecting the Equipment’s Exterior
Upon acquiring a wire labeling machine, the first step is to examine the machine’s exterior for any visible damage to ensure the hardware is intact. This step is just like when you buy your favourite electronics. The first step in getting a new product is to unpack it and check if it is in good condition.
Setting Up the Equipment
Position the machine in a suitable workspace. This may involve integrating it with your existing production line or setting up a separate operating station. Ensure there is at least 1 square meter of space available. The machine is equipped with four casters with brakes, making it easy to move and secure in place.

Checking Power and Air Supply
Verify that the machine’s voltage matches the local power supply. Typically, machines are set to the customer’s local voltage during manufacturing. If there’s a mismatch, you can adjust the voltage, referring to the article titled”Can the Power Supply Voltage of the Wire Labeling Machine Be Changed?“.
However, it is advisable to have a professional electrician perform this task. Also, check if the air pressure meets the required standard. Since the machine operates on both electric and pneumatic power, it needs a consistent air supply with at least 0.6 MPa pressure to function properly.
Connecting Power and Air Supply
Once you’ve confirmed the power and air supply requirements, you can connect them. These steps are straightforward. If the air hose is pressurized when you connect it, you can fold the hose to prevent air from escaping, leaving a small segment at atmospheric pressure. This segment can then be connected to the machine’s air intake. Ensure the connection is secure before unfolding the hose to establish the air supply without interruptions.
Turning on All Power Switches
After connecting the power and air supply, activate all the power switches on the device, including the main power switch, the printer switch (if equipped), and the interface power switch. This ensures that all components are powered and operational.


Installing Labels
Label installation is a crucial step. There are two scenarios: one with a printer and one without.
Label Installation – With Printer
If the machine includes a printer, first install the labels inside the printer, typically involving the placement of a thermal transfer ribbon. You can refer to the article “How to Choose the Right Wire Tag Printer?” for more information on printers.
After correctly installing the labels in the printer, pull out enough label length to then attach it to various transmission shafts of the machine following a specific sequence. Each shaft will have two black retaining rings to secure the label on both sides.
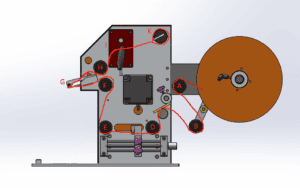
- Pull the tabs out far enough before installing,
- According to the order of A ~ K through each roller;
- Positions C and I as shown above need to be loosened first in order to thread the label in. Once the label is through position C, you can immediately lock it in place.

4. There is a laber sensor between D and E. The label needs to be passed through this sensor. It is very important to operate carefully here to avoid damaging the label sensor.

5.Be careful when the tab goes through the G, where the gap is much smaller. This position is the mechanism that peels the label off.

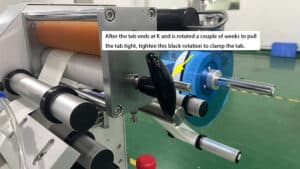
6.After passing through H and I, the tab is eventually clamped at K and K is rotated counterclockwise for a few weeks. The goal is to pull the label tight. Finally tighten the black handle at I to clamp the label.
Label Installation – Without Printer
If the machine does not include a printer, prepare the labels in advance and install them directly onto the feed mechanism. Then, attach the output from the feed mechanism to the transmission shafts of the machine.
The latter steps are the same as the previous ones with the printer, so I won’t repeat them.

Label Sensor Adjustment

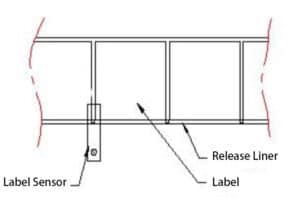
Why adjust the label sensor?
The purpose of adjusting the label sensor is to allow the device to accurately recognize the label so that the label can be printed, transmitted, and other operations.
This precision is vital for several reasons. Firstly, it ensures that the label is correctly positioned for printing, which is essential for maintaining the quality and readability of the printed information.
Secondly, accurate label detection allows for smooth transmission through the machinery, preventing jams and ensuring that labels are applied consistently and correctly on the products. Additionally, precise recognition is important for coordinating with other operations such as cutting or folding, depending on the type of label and the machinery used.
By adjusting the label sensor, manufacturers can enhance the efficiency and reliability of their labeling processes, leading to improved product presentation and reduced waste.
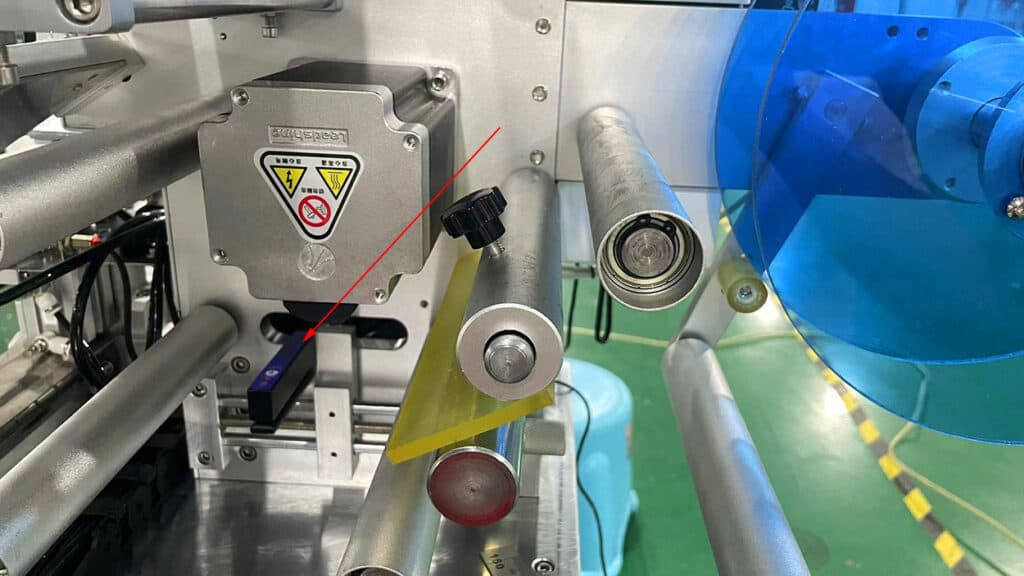
Switch the “Auto/Manual” button on the panel to the “Manual” state, then press the “Traction Jog” button. At this time, visually observe the peeling plate area, allowing the label to extend 0~1mm from the peeling
Move the label sensor to the position between the labels on the backing paper. Pay attention to the signal light of the label When the sensor moves from the label to the backing paper or from the backing paper to the label, the signal light will switch between on and off.
Switch the “Auto/Manual” button on the panel to the “Auto” state, press the Foot Switch or the Object Detection Switch, and observe that after the label is peeled, the distance between the next label and the suction head should be 0~1mm.
If it is too long or too short, it can be adjusted by moving the Label Sensor forward or backward.
Once the above steps are completed, the label can be made to come out properly. Next we come to the labeling part of the debugging.
Adjustment of wire diameter
Adjust the position of the labeling plate by loosening the two screws on the two labeling plates.
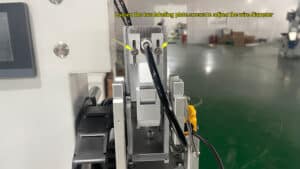
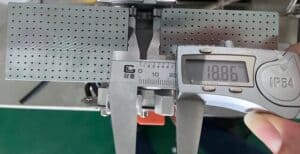
Adjust both labeling plates at the same time to adjust the spacing between them to the A size. The value of A must be at least 1 mm greater than the circumference of the wire.
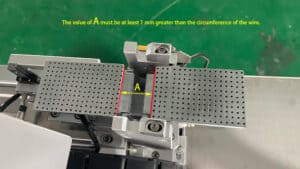
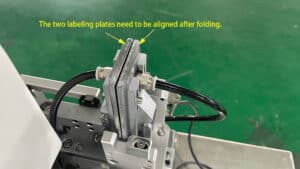
Adjustments need to be made to ensure that the two labeling plates are aligned after being folded. Once the adjustment meets these two requirements, all screws can be tightened.
How to determine the value of A?
As shown in the figure below, if the diameter of the wire is 6mm, according to the formula of circumference, we can calculate A = 3.14 * 6mm = 18.84mm. note that this value should be added 1mm, that is, 19.84mm.
Try initial labeling operation
After completing the above operations, we can try to labeling. First, switch the “Auto/Manual” button on the panel to the “Manual” state. Then, open the operation interface and make sure that the two buttons A and B in the interface are in the state shown in the following figure. Otherwise, click to switch.
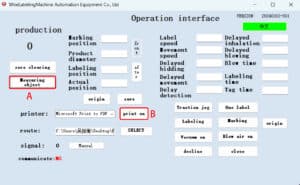
Next, click the “Traction Jog” button 5 times or more. The purpose of this operation is to make the tabs go smoothly. Then, click the “One Label” button to see if the label comes out properly. You can also click it several times to make sure it appears properly.
If all of the above works, then switch the “Auto/Manual” button on the panel to the “Auto” state, wait for the machine self-test and enter the ready labeling state.
Then we can prepare the product for labeling, here is a demo video:
When you finish labeling your first label, the label will most likely look something like this:
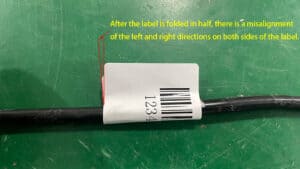
After the label is folded in half, there is a misalignment of the left and right directions on both sides of the label. Or misaligned in the front-to-back direction. As shown in the figure below:
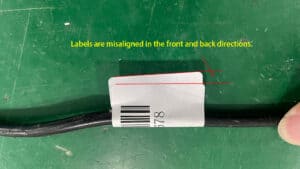
So, we need to make adjustments to the position of the label.
Adjustment of label position
based on the operator, close to the operator for backward, As shown in the figure below:

Adjust the left and right of the label
If the label is off left or right, then first loosen the 4 A screws in the picture below and adjust the 2 B screws. After adjustment, label again and observe if the left/right deviation improves. If not, continue to adjust until the left/right deviation disappears. Then tighten all screws.
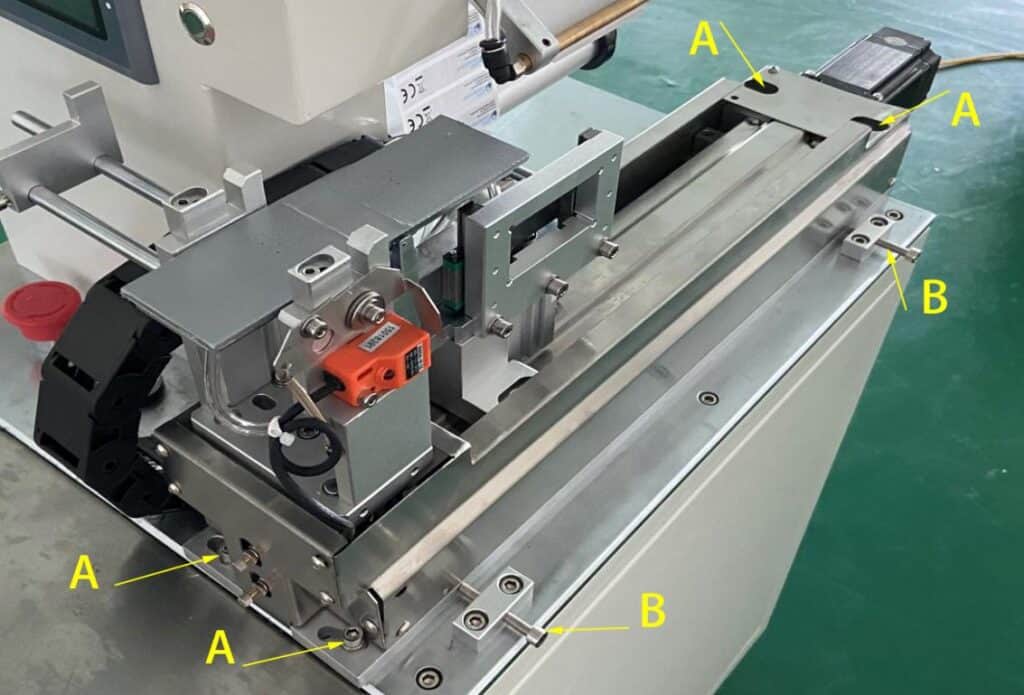
Adjust the front and back of the label
Before adjusting the front and back position of the label, we need to observe how much the front and back position of the label deviates. If the deviation is relatively large, then we need to adjust the relative position of the labeling mechanism and the peeling mechanism first.

In this case, we need to adjust the relative position of the labeling mechanism and the peeling mechanism first. First, press the “Front” button in the HMI until the labeling mechanism moves to the center of the peeling mechanism, as shown in the figure below:
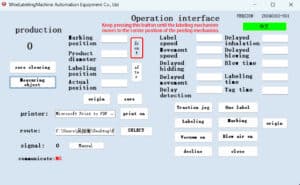
The “center position” is only a subjective approximation, we try to move to the center position as much as possible.

After moving the labeling mechanism to the center of the peeling mechanism, click the “Save” button in the interface so that the machine remembers this position.
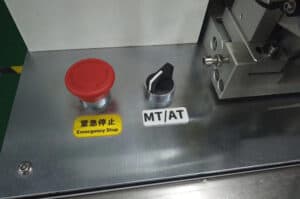
Note: All of the above adjustment operations are performed manually. This means that the “MT/AT” button needs to be turned to MT.
Next, we performed the labeling operation again(Shift to AT) to observe the deviation before and after the adjustment, as shown below:
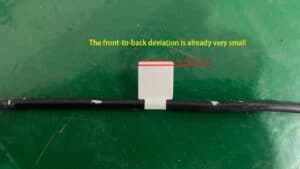
When the front-to-back deviation of the labels is very small, adjust the fine-tune button to achieve the final alignment.
This process needs to be operated several times to ensure that the final satisfactory result is achieved.

Punching holes in labeling plates
Labeling board has a lot of small holes, their role is to suck the label. If the label is not as big as the labeling board, use adhesive paper to cover the labeling board.
After covering the labeling plate, then according to the size of the label to determine how many holes to punch. Be careful that the holes must not exceed the size of the label. as shown below:


Electronic Control
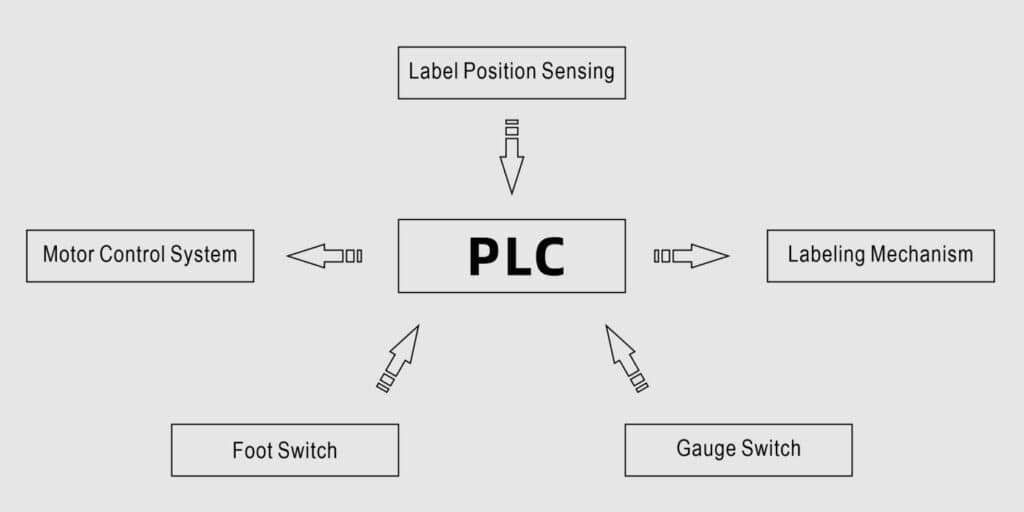
Working Principle
The labeling machine takes PLC as the core to receive signals and control the actions of each mechanism. When stepping on the “foot switch” or triggering the “measuring switch”, the switch will send the start signal to the PLC, which will process according to the set program and then start the motor control system to realize the peeling and feeding action.
At the same time, the label sensor will always pay attention to the distance traveled by the label, when advancing the distance of a label, the label sensor will immediately send this signal to the PLC, the PLC will be processed in accordance with the set program, the motor control system sends out a stop signal, and at the same time to start the suction label and labeling action, to complete the process of a peeling and labeling.
Checks for each movement
As shown below, each button in the red box represents an action. When one of these buttons is clicked, the corresponding one action is executed individually. The prerequisite is that the device is in the manual state.
This design facilitates checking and adjusting each action of the machine individually. When each action has been adjusted, then put the machine in the automatic state. It is then possible to make the machine work properly.

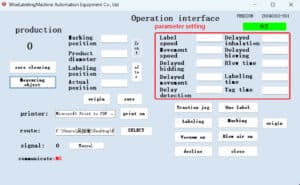
Parameter setting
Label Speed: The speed at which labels are dispensed can be adjusted by altering the settings to either increase or decrease the speed.
Movement Speed: The speed at which the labeling plate moves from picking up the label to the labeling station.
Delayed Bidding: The wait time for the label to be picked up after the label picking mechanism is in position.
Movement Delay: The duration the label stays on the label picking plate after being picked up.
Delay Detection: The time interval for the label sensor to detect the gap between consecutive labels.
Delay in Suction: The duration of suction after the label is picked up by the suction plate.
Delayed Blowing: The continuation of blowing air after the label is placed on the suction plate.
Blow Time: The duration for which the air is blown through the blowing tube.
Labeling Time: The time it takes for the labeling plate to adhere the label to the product.
Tag Time: The time it takes for the label plate to return to position after the product has been manually removed.
Common Troubleshooting
Unstable labeling position
- The pressure belt device may not be pressed tightly, resulting in a loose labeled belt and inaccurate detection by the laber sensor;
- The traction mechanism may be slippery or not pressed tightly, resulting in not being able to take away the backing paper smoothly;
- The shape of the labeled object is different or the positioning is not uniform.
Label tape shifting
- The pressure belt device is too tight, resulting in labeling with deviation, pressure belt strength can be reduced.
- Before the automatic operation, there is no labeling tape deflection correction, re-edit can be corrected.
Poor labeling quality, bubbles or wrinkles
- The label may be too thin, the suction method is not suitable for too soft, too thin transparent labels.
Unresponsive equipment
- Confirm that there is no problem with the power cord;
- Confirm that the fuse next to the output socket is intact, if it has been burned out, replace it;
- Maybe the wiring inside the electric box is loose, please ask a professional to repair.
Frequent breakage of label backing paper
- Pressure belt device is too tight, resulting in labeling with bias, pressure belt to reduce the strength can be.
- Possible label backing paper quality is too poor, or in the cut mark is too deep.
Suction head failure, the phenomenon of falling off the mark
- Most of the suction head holes are blocked, resulting in insufficient suction (to ensure that the air pressure is above 0.6Mpa);
- Blowing tube blowing direction is not correct, can be adjusted by moving up and down and rotating direction;
- Will not be covered by the label, with transparent adhesive seal up to reduce the loss of suction.
Continuously out of the mark
- The laber sensor is not set properly, reset the laber sensor.
The backing paper recovered by the material collecting organization is loose.
- Most is behind the drive belt aging, please replace the new belt can be.
Service Commitment
- Provide professional technical consultation before sale, guiding customers in making rational selections;
- Offer labeling machine usage training services, instructing customers on the correct use and maintenance of the labeling machine;
- Provide technical support services, assisting customers in resolving issues with label application;
- One-year warranty for the equipment, offering repair services.
You may be interested:


